User Guide

Install Blocker

The first step to start using Blocker is to install it!

1

Download Installer

Download the free installer from the pricing page
2

Install Blocker

After downloading the exe file (for Windows) or pkg file (for macOS), double click the installer to run it and follow the prompts.
3

Install Extensions

When first installing Blocker, a popup will appear which will show you which browsers were found on your computer. Click the install button for each browser to install the extensions and then follow the prompts. Don't forget to enable incognito permissions for the extension!
4

Activate Pro

If you purchased pro, you can activate all features from the free installer by clicking the "upgrade to pro" button and pasting your product key in the appropriate box. If you lost your product key, you can request it from the link in the FAQ on the support page.

Hello Blocker!

Screenshot of overview tab in Blocker

Installation FAQ

I don't see incognito mode permissions but Blocker keeps asking me to enable it!
I'm working on a fix, but for now please manually disable incognito mode using these instructions. After doing this, Blocker shouldn't bother you about this anymore.
How do I open the app afterwards?
To open Blocker in the future, double click the desktop icon (Windows) or click the icon in the dock (macOS).
Do I need admin rights?
Yes, there's no way around this. Blocker needs admin rights for various reasons and there's no way to install the app without it.
Do you have a version for my phone?
Android, iOS or other operating systems like ChromeOS are not supported. Limitations in the operating system prevent apps like Blocker from being hard to delete.
Do you have a Linux version?
No, unfortunately it's hard enough to support two platforms already. Maybe in the future, but not right now. Thanks for understanding!

General Overview

Once you open Blocker, the interface will automatically open to the "Overview" tab. Here are what the tabs do:

Overview

This tab shows you what blocks are currently active and which blocks are scheduled for later in the day. If you have any breaks set, this is where you can see the remaining time for allowances and the status of your pomodoro timers.

Blocks

This is where you can edit your block lists, edit schedules, add breaks, start blocks and lock them if you choose. This is mainly where you'll go to configure the app.

Statistics

If the statistics feature is enabled, here is where you can view how many times things were blocked and see how long you've been using certain websites and applications.

Settings

This is where you can configure all other application-wide settings that aren't related to configuring a specific block. Things like locale preferences, themes, notifications, blocking settings (for all blocks), statistics settings and your application password.

Blocks Tab Overview

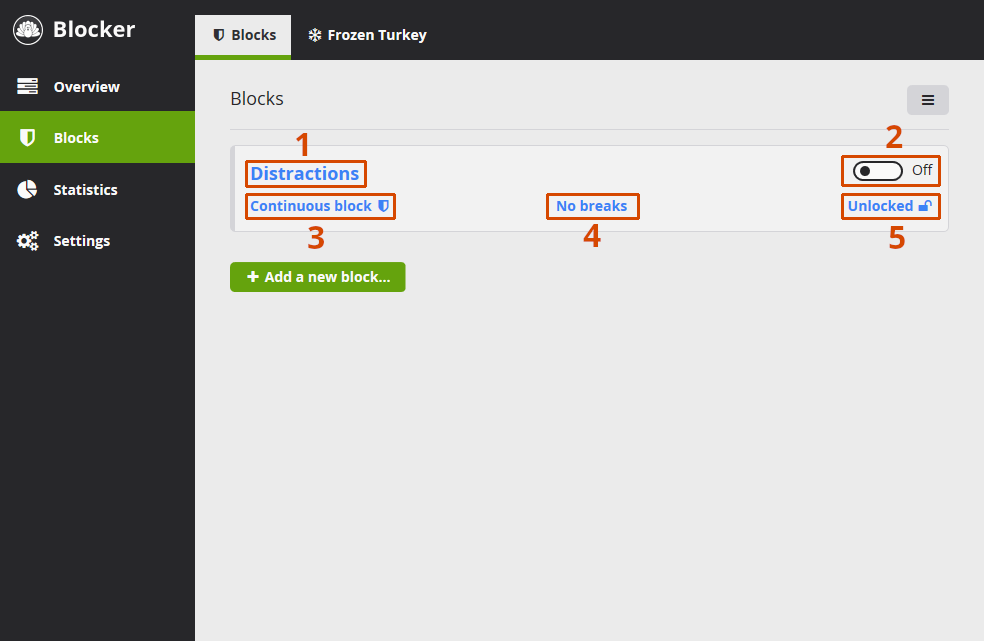
This is where you can edit your block lists, edit schedules, add breaks, start blocks and lock them if you choose. This is the main tab you'll be using most of the time.

1

Edit what gets blocked

Clicking the name of the block will let you edit blocked websites, website exceptions and blocked applications.
2

Enable or disable a block

Toggling the switch on and off will enable and disable the block. This toggle also needs to be on to enable scheduled blocks.
3

Edit the schedule

If you want the block to follow a schedule, click here to edit the schedule. By default, blocks are 'continuous' which just means it'll run all the time until you disable the block using the toggle.
4

Edit breaks

Breaks can be configured by clicking here on a continuous block. When blocks are scheduled, you can click here to open the scheduler so you can change the break on individual scheduled blocks.
5

Lock your block

This is where you can choose to lock the block. Time based locks will disable the toggle above so you can't disable the block once started. Password and random text toggles can be clicked for authentication before editing the lock again.

Extra Details

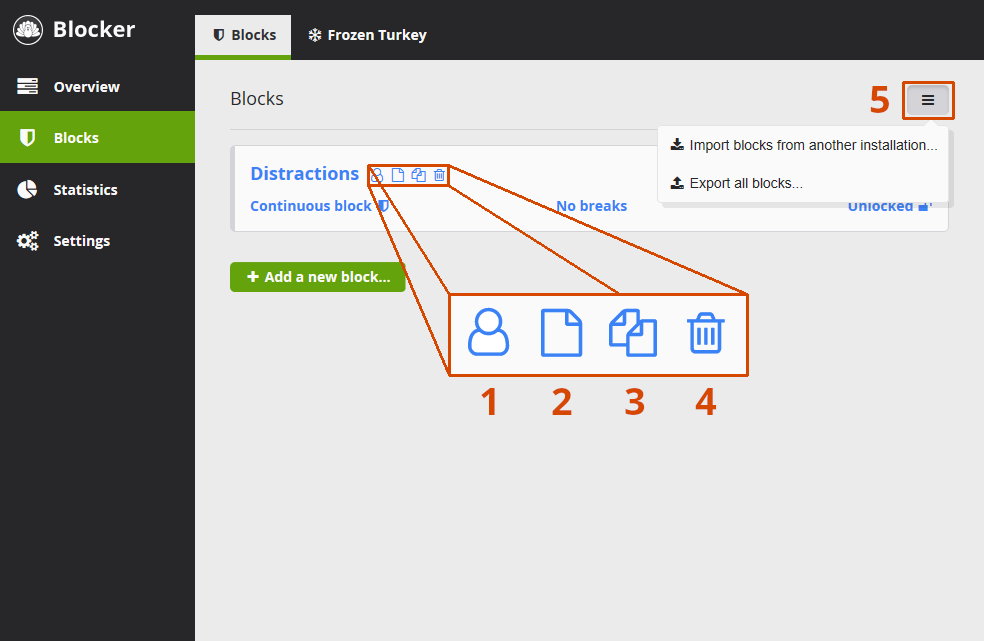
More options show up to the right of the block name when you hover over the block with your mouse.

1

Edit affected users

Sometimes you want the block to only affect other users of the computer. Clicking this button will allow you modify which users are affected by the block.
2

Rename block

You might want to change the name of the block at some point, so you can click here to do that.
3

Duplicate block

If you want to make a similar block to one that already exists, use this button to make a copy. You'll be given the chance to give it a new name. Don't worry, it won't be enabled right away if the block you're copying is already enabled.
4

Delete block

You can click this button to delete a block you don't need anymore. As you guessed, you can't delete locked blocks.
5

Export or import blocks

This button lets you import and export all blocks from another installation. If you only want to import or export a list websites or exceptions to a block, edit the block first and click the import buton you see there.
Extra buttons show up after hovering over the block

Website Blocking

Now let's go through an example on how to edit a block. Here you'll see how to add, and then remove, a website from the block.

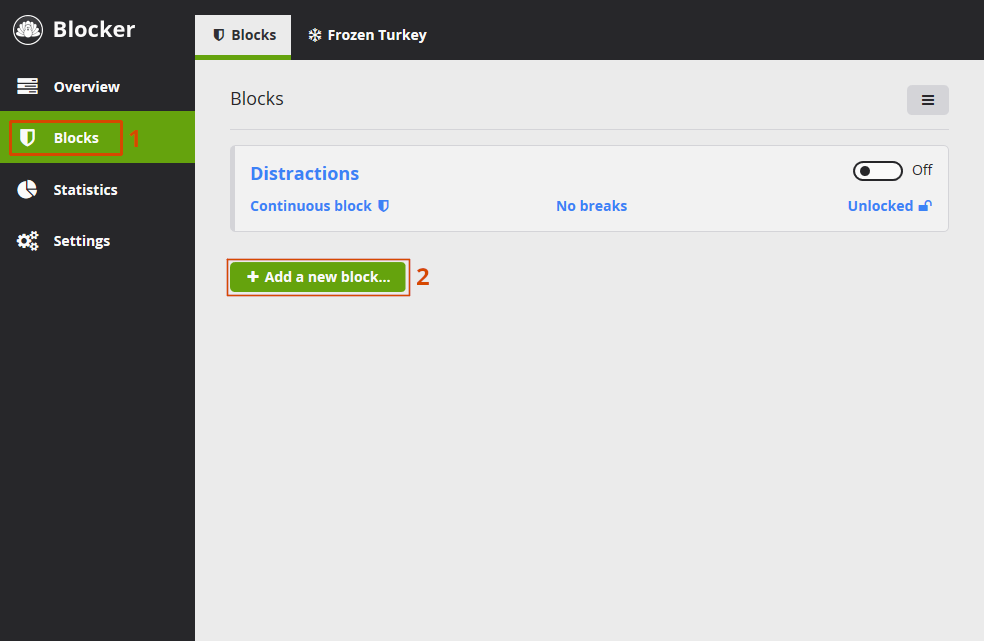
Edit a Block

First click the Blocks tab, then the name of the block you want to edit. In this case, Distractions.

Create a New Block

Or, you can create a new block by clicking the Add a new Block button.

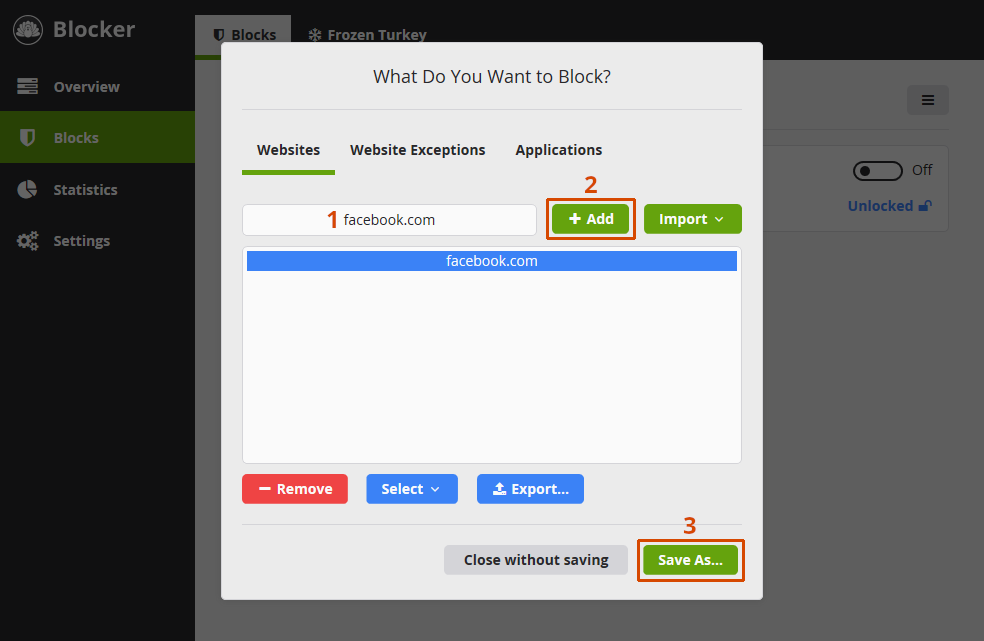
Add a Website

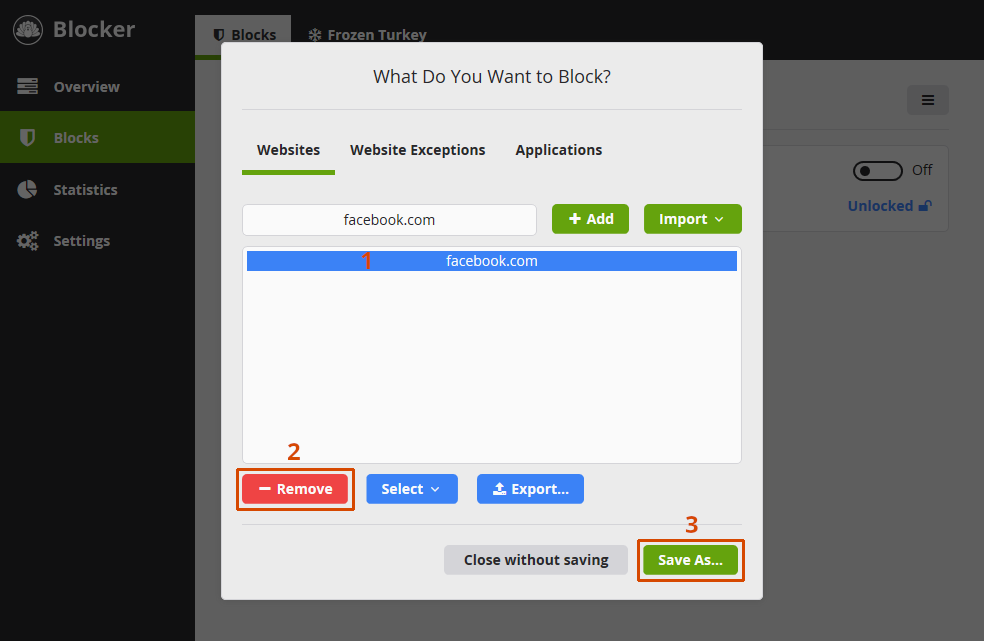
To add a website to the list, type the domain or specific page in the text box then click the Add button, or press the enter key.

Remove a Website

First click the entry you want to delete, then click the Remove button or press the delete or backspace key. Hold the Ctrl or command key to select multiple entries, or use the Select button to select all entries. You can also press Ctrl + A or command + A keys to select all entries.

Edit an Entry

Double click an entry to edit it. Once you do, it'll be removed from the list and show up in the text box at the top for you to edit.

Find an Entry

Press Ctrl + F or command + F to search through your block list for an entry.

Website Blocking FAQ

Can I block a category of websites?
Yes, while editing a block go: Import > Website categories and select a category.
How do I export or import a block?
To export a block, just click the Export button at the bottom of the list. To import a list, go: Import > Websites from file... The file must be a plain text file (.txt) with one entry per line.
What does the wildcard character (*) mean?
The * character represents any text. If you want to block all websites with "unicorn" in the URL, you could add *unicorn* to the block. If you only want to block Google searches for "unicorn" you could add: google.com/*q=*unicorn*
Can I block websites based on window title?
Yes, but only in Blocker Pro for Windows. To do this, go to the Applications tab when editing a block and click Add window title... Adding *sports* will block websites (not the entire browser) with the word sports in the title. Keep in mind that applications (other than your browser) with sports in the window title will be blocked.

How To

How to block a specific page or subdomain.
Instead of adding the domain facebook.com, just add in the specific page or subdomain you want to block: facebook.com/example or example.site.com
How to block the entire Internet.
While editing a block go: Import > The entire internet or simply add *.* to the block list.
How to block keywords from being searched.
While editing a block go: Import > All searches containing... In the popup, type the keyword(s) you want to be blocked. Multiple words will be seperated by wildcard (*) characters.
How to require Google Safe Search to be enabled.
First, please force safe search using these instructions. Specifically the heading "Map google domains to forcesafesearch.google.com."

Then on Windows, make the C:\Windows\System32\drivers\etc\hosts file read-only by right-clicking the file and selecting properties.

Finally, you can add "hosts properties" as a window title to your block so you can't undo the read-only property.

For macOS users and non Blocker Pro users, the free version of Qustodio may be able to help as well.
How to block a Youtube channel.
You can block youtube channels by adding youtube.com/<youtube channel name> to the list.
How to block Youtube completely, except for a few videos.
The easiest way would be to only allow certain YouTube channels. Or, you can only allow certain videos by adding them to your YouTube "Watch Later" playlist. Then add this entry under your website exceptions tab: youtube.com/*list=WL*

To watch the videos you’ve allowed, just visit: youtube.com/playlist?list=WL

Website Blocking Troubleshooting

STEP 1

Ensure that the block is active.

Please make sure that the toggle is enabled on the Blocks tab. The toggle must also be enabled for scheduled blocks to work as well.

STEP 2

Ensure your user is included.

Please make sure that the block affects your user (or all users) by hovering over the block and clicking the little icon that looks like a user.

STEP 3

Ensure there isn't a break.

If an break is set for the block, you'll be able to use the blocked websites and applications until your Pomodoro break is over or you use up the remaining allowance.

STEP 4

Double check website exceptions.

This is probably the most common source of issues. Too generic exceptions can sometimes conflict with something you want to block.

STEP 5

Make sure the extension is installed and enabled.

You can confirm this by going to chrome://extensions on Chromium browsers or about:addons in Firefox.

STEP 6

Double check extension permissions.

Along with incognito permissions, make sure that Site access is set to On all sites. In Opera, make sure that Include in search pages is enabled.

STEP 7

If using Firefox.

Try removing the extension and installing the latest version manually.

STEP 8

If using macOS version 10.12 to 10.14.4.

Please try installing the Swift 5 Runtime libraries and then restarting your mac.

STEP 9

If using Safari.

Please make sure that the extension is enabled by opening Safari. Then click Safari in the menu bar and click Preferences then go to the Extensions tab and ensure that the checkbox beside Cold Turkey is checked in.

Website Exceptions

1

Edit a Block

First click the Blocks tab, then the name of the block you want to edit. In this case, Distractions.
2

Edit Website Exceptions

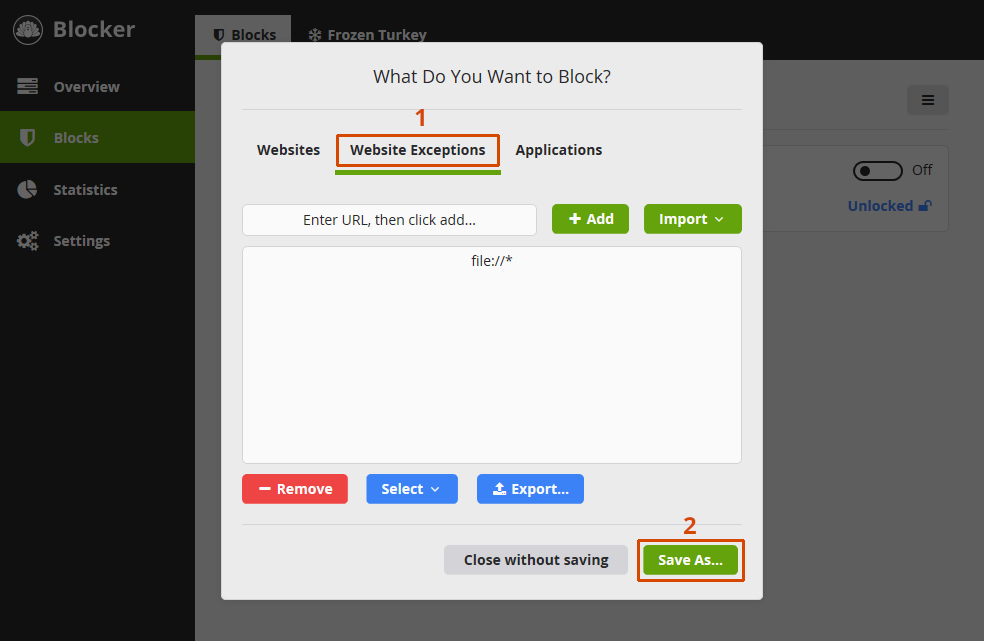
Click the Website Exceptions tab to edit the exceptions. Sites listed here will not be affected by this block, even if it matches something under the websites tab.

What's file://*?

This is a default entry that allows local files to be loaded. For example, if a browser is your default PDF file viewer, this exception allows you to load pdf files on your computer regardless of what's being blocked.

Blocks are Independent of Each Other

Exceptions only apply to the current block. If you have mail.google.com as an exception in one list but not in other blocks, it might still be blocked if the other blocks also don't that exception.

Website Exceptions FAQ

Can I only allow a category of websites?
Yes, after adding *.* to the Websites tab, click the Website Exceptions tab and go: Import > Website categories to select a category.
Can I block all pages on a site except one?
Yes. You can do this by adding the domain under the Websites tab and then add the specific page or subdomain under the Website Exceptions tab.

Exceptions are explained futher in the next section.
Can I block everything except a few websites?
Yes, after adding *.* to the Websites tab, click the Website Exceptions tab and add the sites you want to allow.
I added an exception but it's still not working, why?
Exceptions only apply to the current block. If you have mail.google.com as an exception in one list but not in other blocks, it might still be blocked if the other blocks also don't that exception.

Application Blocking

There are a multiple ways to block applications for both Windows and macOS.
Here we'll cover the different types of application blocks for each.

Windows

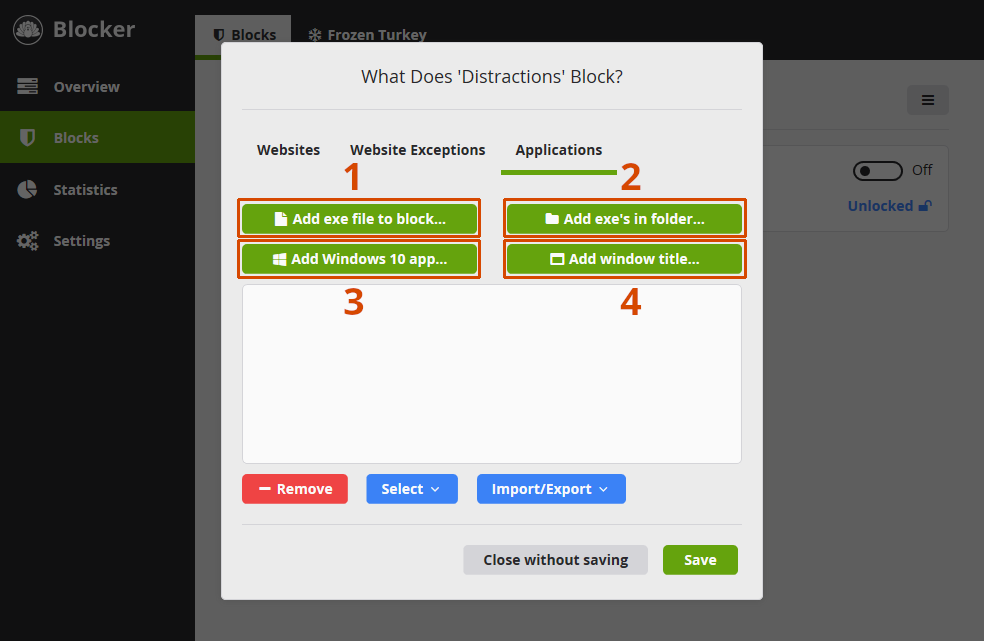
If you're unfamiliar with how to edit your block, so that you see this popup window, please review the website blocking section on how to edit the block.

1

Add exe file

This is the most common way to block an application on Windows. Applications usually install themselves in C:\Program Files or C:\Program Files (x86), which is where you can usually find the file. You can also use the Windows Task Manager to locate the exe file of an app by right clicking the process and clicking "Properties."
Applications blocked using this method can not be moved or renamed during a block as Blocker locks the file with Windows.
2

Add exe's in folder

In some cases, like with Steam or some individual games, an app might have too many exe files to add individually. You can use this to block any exe running from particular folders. Other apps like Discord and Opera like to have different exe files for each version, so this could be used for those apps as well.
3

Add Windows 10 app

Applications you install from the Windows Store are located in a secure folder that users normally don't have access to. This button lets you easily add these types of apps so that you don't need to make any system changes to view the exe file.
4

Add window title

In rare cases, blocking the window title of an app might be the best solution. An example of when this can be useful is when blocking a folder on your hard drive. Adding the folder name of the folder you want to block will prevent you from going into that folder.
Note that window title blocks also apply to browsers. In the case where a website title matches an entry, only the webpage will be blocked, your browser won't be blocked entirely.

macOS

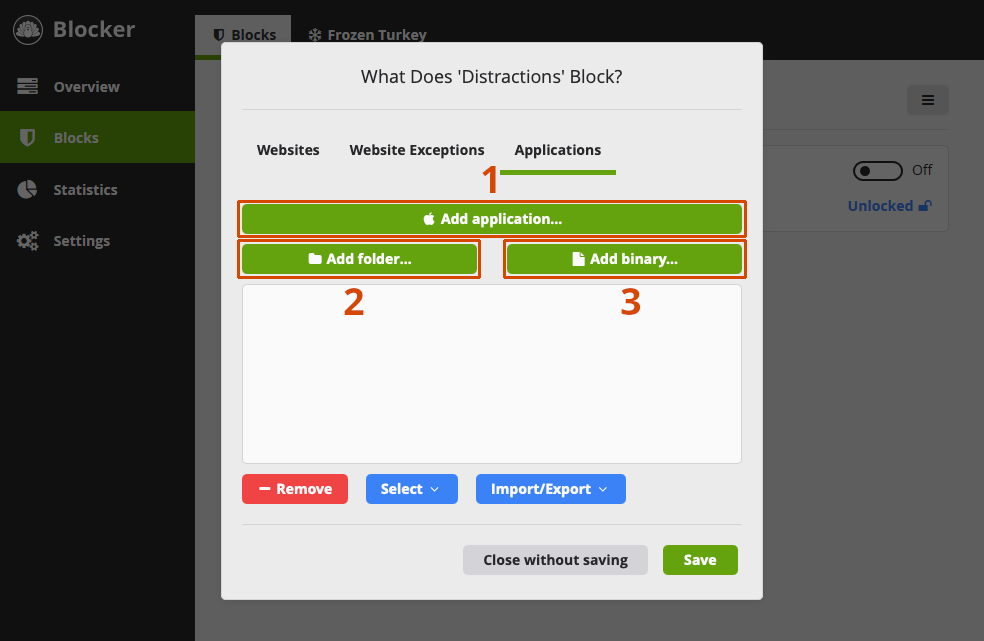
If you're unfamiliar with how to edit your block, so that you see this popup window, please review the website blocking section on how to edit the block.

1

Add application

This is the most common way to block an application on macOS. Most applications you've installed are located in your Applications folder and can be added here.
Applications blocked using this method can be moved or renamed during a block, but won't affect Blocker's ability to block them.
2

Add folder

In case you conveniently placed all your distracting apps in folders, this feature can save you time since all you would need to do is add this folder here.
3

Add binary

In rare cases where an application isn't in a regular .app file, the binary file can be added here. This feature is mostly for advanced users that want to block things like Java.
Screenshot of applications tab on macOS

Application Blocking FAQ

Can I have an application whitelist?
You can with Micromanager, but not with Blocker. This is because an application whitelist is too restrictive to be scheduled ahead of time. It's just difficult to determine all applications you'll need a week in advance (ex: PDF viewers, Calculator, Dropbox). Micromanager let's you whitelist applications for shorter durations of time though.
Do window title blocks (on Windows) apply to browsers?
Yes, in the case where a website title matches an entry, only the webpage will be blocked, your browser won't be blocked entirely.

How To

How to block Discord on Windows.
First, please enable viewing hidden folders since Discord is installed in a hidden folder. Then, while editing your blocked applications, click Add exe's in folder and add this folder C:\Users\your-username\AppData\Local\Discord
How to block Roblox on Windows.
While editing your blocked applications, click Add Windows 10 app and add this (very non-descriptive) entry: Win10Universal.exe
How to block the Mail app on Windows.
While editing your blocked applications, click Add Windows 10 app and add these two entries (the second one might not exist and that's okay): HxOutlook.exe and commsapp.exe
How to block Netflix and Twitter apps or other apps that aren't shown in the Windows 10 list.
Unfortunately these kind of apps are tightly integrated within Windows and can't be blocked normally. You do have a couple options though. The first option is to block all Windows 10 style apps by adding these exes to the block list: C:\Windows\system32\applicationframehost.exe and C:\Windows\system32\wwahost.exe. The second option is to uninstall the app and block the Windows Store app so that you can't reinstall it. The Windows Store app is listed under the Win 10 tab as: WinStore.App.exe

Application Blocking Troubleshooting

STEP 1

Ensure that the block is active.

Please make sure that the toggle is enabled on the Blocks tab. The toggle must also be enabled for scheduled blocks to work as well.

STEP 2

Ensure your user is included.

Please make sure that the block affects your user (or all users) by hovering over the block and clicking the little icon that looks like a user.

STEP 3

Ensure there isn't a break.

If an break is set for the block, you'll be able to use the blocked websites and applications until your Pomodoro break is over or you use up the remaining allowance.

Windows

STEP 4

Ensure that the right exe is added.

You can test this by opening the task manager and ending the process you blocked in Blocker. If this doesn't close the app, there might be another exe you need to add. You can use this tool to show the process name of the app currently running in the foreground.

STEP 5

Re-install the Windows service.

Blocker uses a background service to block applications. You can re-install the service by running this exe: C:\Program Files\Cold Turkey\CTServiceInstaller.exe. Nothing will appear after running it, but it should start the block.

STEP 6

Update or reinstall the app.

Please make sure you're using the latest version of Blocker. To update, please run the latest free installer available on the pricing page.

macOS

STEP 4

Update or reinstall the app.

Please make sure you're using the latest version of Blocker. To update, please run the latest free installer available on the pricing page.

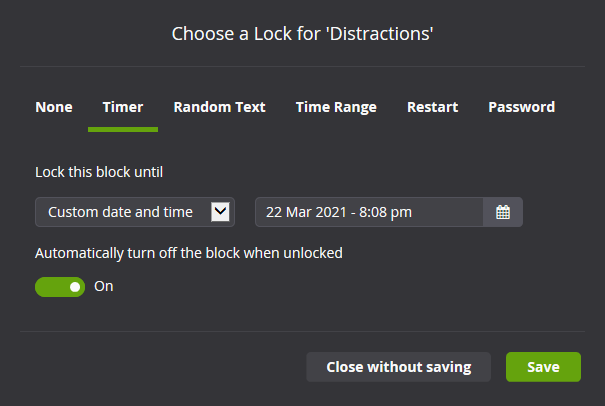
Lock a Block

To prevent yourself from easily disabling the block, you can choose to lock your block. A locked block will also:

  • Prevent the uninstaller from working (fails when you click Next)
  • Require the browser extension to be enabled when using browsers
  • Disable some changes under Settings > Blocking
  • Prevent you from using Brave Tor windows, guest browsing and other common ways of circumventing a block

If you're unsure about how to lock your block, please see point 5 on the block tab overview.

Timer

Prevents changes until a specified time in the future. You can extend the lock during a locked session if needed.

Random Text

Requires you to type out a series of randomized characters to unlock the block. The length of randomized text can be customized between 1 and 999 characters.

Time Range

Prevents changes or only allows changes to the block between certain times of day (not to be confused with scheduled blocks). You can use scheduled blocks and time range lock at the same time though, to prevent changes to the schedule during certain times of day.

Password

In the pro version, a password can be used to lock the block. This can be a useful feature for parents or someone with an accountability partner.

Scheduling Blocks

If you're unfamiliar with how to edit the schedule, so that you see this popup window, please see point 3 on the block tab overview.

1

Block type

This is where you select if you want the block enabled at all times (continuous), or following the schedule. Clicking the schedule option will enable the scheduler so you can add blocks to it.
2

View other blocks

In case you have other blocks scheduled, enable this option to view them on the schedule to get a better picture of all the blocks that are already scheduled.
3

Add a new block

To add a new block, click and drag in any empty area of the schedule. You can select the area to the right of an existing block if something needs to overlap. You can't have two overlapping blocks for the same block list though since the breaks would conflict and things would get messy.
4

Edit existing block

Just click the block to edit it's times or to add a break. You can also move the block by clicking and dragging the area where the times are dispayed.
5

Other blocks

If the "display other enabled blocks" is enabled, these greyed out blocks show you when the other blocks are scheduled.
Screenshot of schedule

Editing Scheduled Blocks

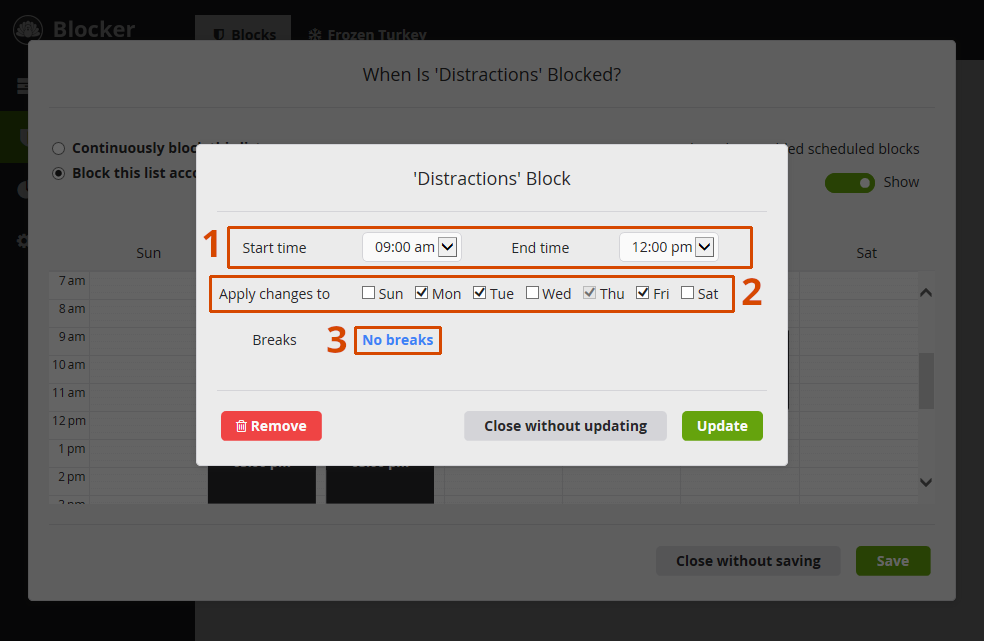
Once you click and drag on the schedule (to add a new block) or click an existing scheduled block, this is what you'll see.

1

Edit the block times

If you dragged a block on the schedule, these will be automatically set to where you clicked. Instead of 15 minute intervals on the scheduler, you can edit these times with 5 minute increments.
2

Apply the block or changes to other days

These checkboxes quickly allow you to apply the block to multiple days at once to save you some clicking. If you edit a scheduled block with similar start times and break settings, these checkboxes will automatically check in so that you're editing the group of similar blocks at once.
3

Add a break

Scheduled blocks each have their own break which you can edit by clicking here. Pomodoro breaks will start with a work session at the beginning of the block and then switch over to your break and repeat until the block is over. Allowances will apply between the start and end of scheduled block.

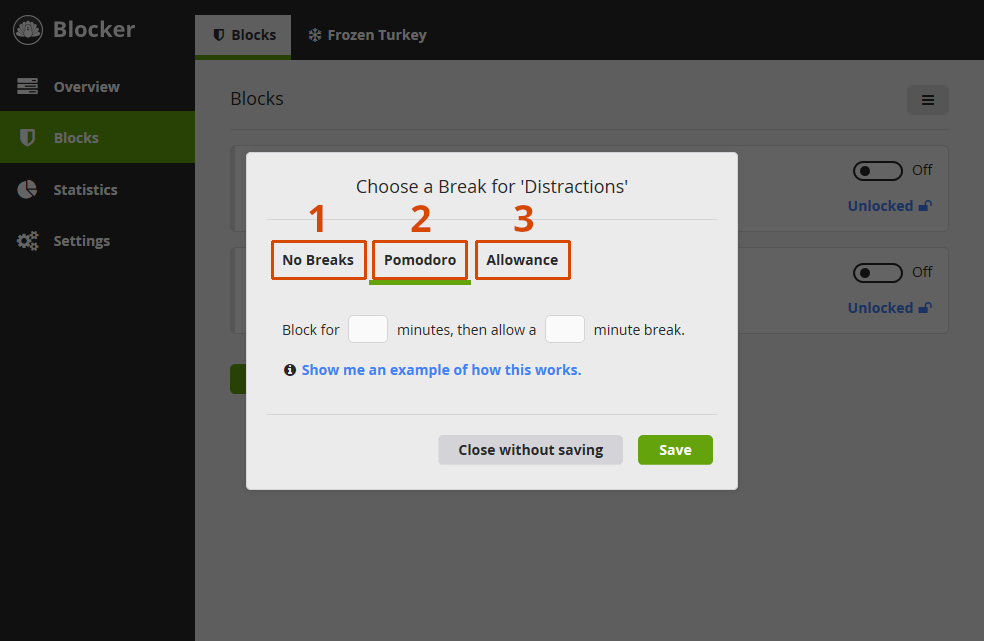
Breaks

If you're unfamiliar with how to edit a break with a continuous block, please see point 4 on the block tab overview. For help on how to add a break to a scheduled block, scroll up the previous section.

1

No breaks

Pretty simple, there is no break. The block will always be active during continuous blocks or the times specified for scheduled blocks.
2

Pomodoro

Pomodoro timers alternate between work periods (block active) and break periods (block inactive), starting with the work period. Midnight will be used as a reference point for calculating the work and break periods, except for the day you started the block when the time you start the block is used. Scheduled blocks will always use the start time of the block.
Example: Let's say your block starts at 9:00 with 20 minutes blocking and a 10 minute break set. You'll be blocked for the first 20 minutes (9:00 to 9:20) and then unblocked for the next 10 minutes (9:20 to 9:30). At 9:30, the block will start again and you'll have another break at 9:50. This repeats until the block is over.
3

Allowance

This type of break lets you use blocked items for the number of minutes your allowance is set to. Time towards your allowance is only counted when the application or website tab is in the foreground, but this can be changed under Settings > Statistics. It also only counts down the time if there's been mouse movement in the last 3 minutes, in case you get up and leave the computer.
Example: Let's say your block starts at 9:00 and ends at 11:00 with a 30 minute allowance set. At any point during the block, you'll be able to use items in the block list for a combined total of 30 minutes. After which, the block will take effect. For continuous blocks that span multiple days, your allowance period runs from midnight to midnight (except the day you started the block, where time is only counted after you started the block).
Screenshot of editing a break

Want to see your break status in your browser?

You can view time remaining in your Pomodoro period or your allowance from the extension (except Safari). Just click the extension icon in your browser and select which block you want to see the break for in the dropdown.

Frozen Turkey

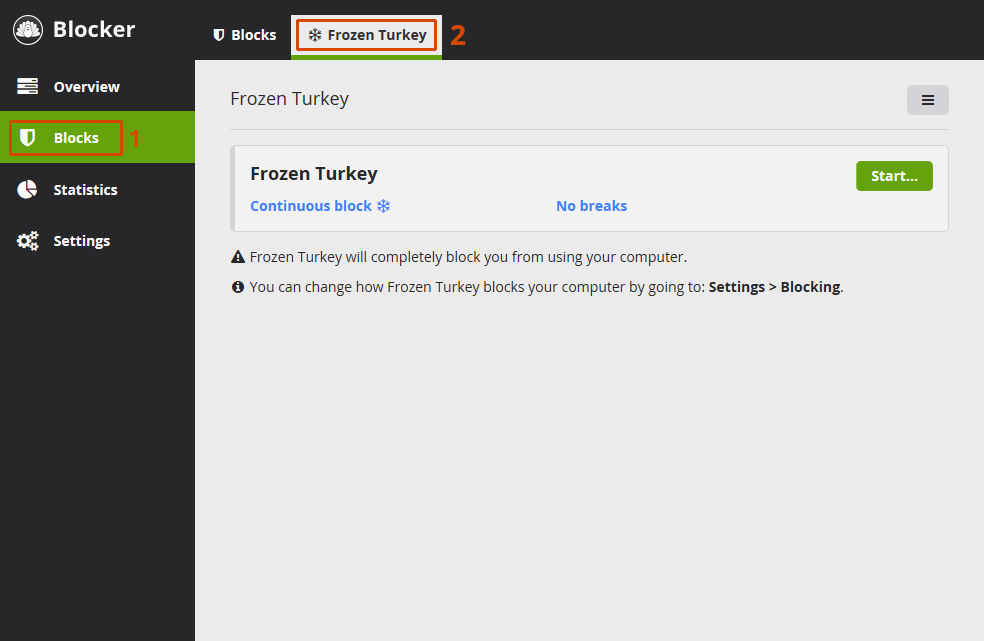
Frozen Turkey is a type of block that you can use to lock, log off or shutdown your computer. This feature makes it easy to schedule time away from your workstation for a break or a quick walk.

1

Start Frozen Turkey

First click the Blocks tab, then click the Frozen Turkey tab at the top. Like other blocks, you can schedule blocks by clicking the link under the block name. Unlike other blocks, you can't click the name to edit it since it only does one thing.
2

Frozen Turkey Settings

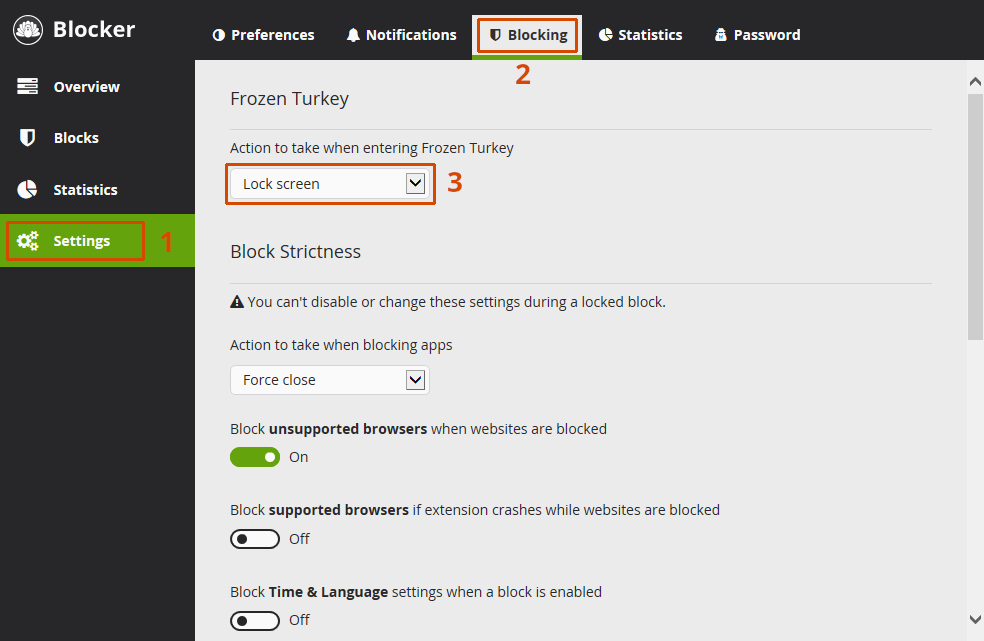
Frozen Turkey can be set to lock, log off or shutdown your computer. This setting is accessed by going to Settings > Blocking as seen below.

What happens when I click start?

Clicking start will open a popup where you can select how long you want the block to last with a timer (since you can't change any settings while Frozen Turkey is active). The green start button is only visible when you have Frozen Turkey set to a continuous block.

Can I have a Frozen Turkey schedule and a timer on demand?

Unfortunately, no. This might be something I work on in future versions though!

Statistics Tab Overview

Your settings and statistics are only stored on your computer and never collected. You can export the visible statistics by clicking the little grey button in the top right corner of the tab.

1

Change time frame

Use predefined time frames from the drop down or select a custom time range from the input boxes to the side.
2

Which users to include

If you only want to see statistics for a specific user, this can be selected here.
3

Chart type

Select between seeing the top 5, top 10 or searching for an entry. To search for part of a url or application, just enter the keyword (without any wildcard characters). Window titles will also appear in results and only the top 10 search results will be displayed.
4

Filter

If the chart type is set to top 5 or top 10, you can choose to only lookup entries from a certain block here. If the type is set to search, this will become a textbox for you to perform the search.

Settings Tab Overview

There are multiple sub tabs to the Settings page. Some settings are pretty self-explanatory, but we'll cover some of the more confusing ones that might need a little more explaining.

Preferences

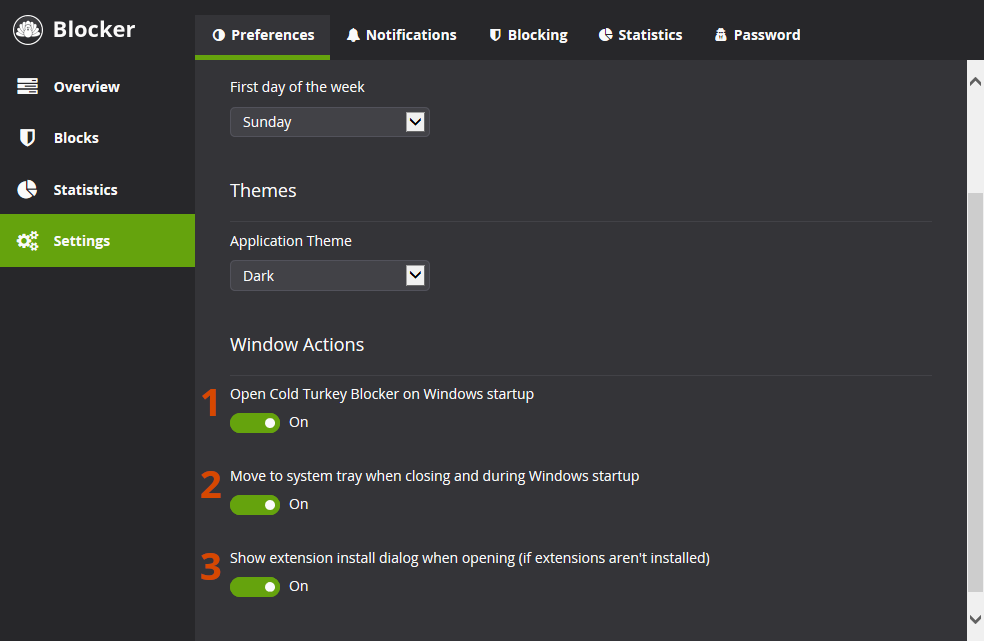
At the top, you'll find regional settings like whether to use 24 hour time or changing the start of the week to Monday or Sunday. There's also a dark theme if you prefer the color scheme better.

1

Open on starup

Your block will always work regardless of what this setting is set to. This only applies to the user interface portion that runs in the system tray by default.
2

Move to system tray

If this setting is enabled, the app will run in the system tray on startup. If the setting above is enabled and this setting is disabled, you'll see Blocker popup in the foreground when you start your computer.
3

Show extension install dialog

If you don't want to install an extension for a browser, this setting tells Blocker not to open the extension install dialog when opened. Blocker automatically checks to make sure you have the required extensions installed. If it finds a missing extension, it will show a red button in the bottom left corner and open the extension install dialog by default.
Screenshot of the preferences available

Notifications

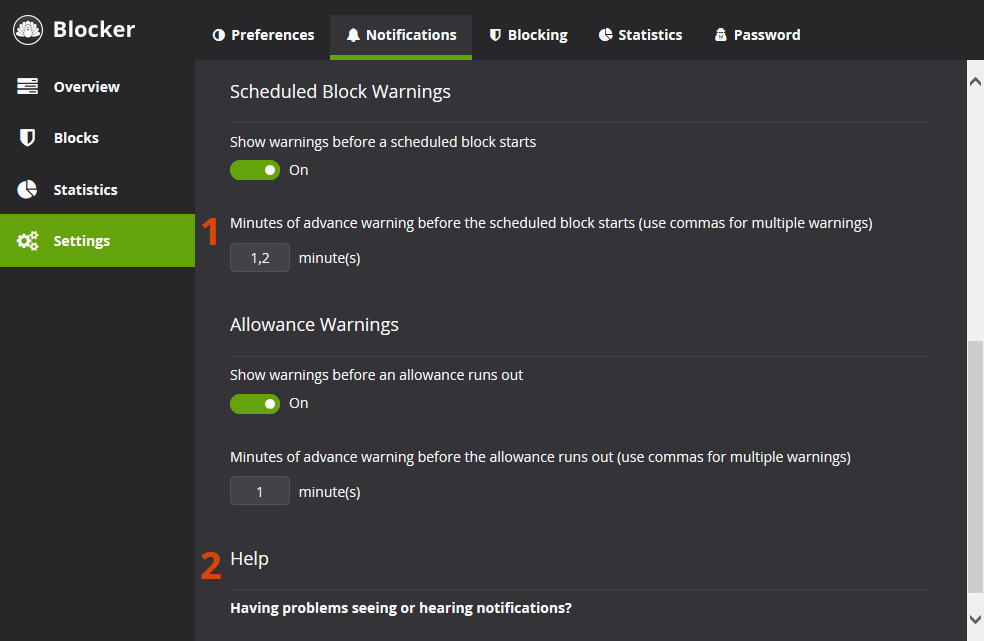
Six other notification settings are not displayed in the screenshot. These settings allow you to choose whether or not you get notifications when: a locked timer ends, a scheduled block starts and/or ends, Pomodoro status changes, your allowance runs out and when applications are blocked.

Keep in mind, you can also display the status of your breaks or allowance from the extension icon by clicking it and selecting the block from the last dropdown.

1

Minutes of advanced warning

These textboxes allow you to add multiple warnings by seperating them with a comma. For example, if you have a 10 minute allowance (or scheduled block starts in 10 mintues), you can set this box to "2,5" to get a 2 minute and 5 warning before the allowance runs out (or the scheduled block starts). You can also set it to "3" for one 3 minute warning.
2

Notifications help

If you have any issues seeing notifications, these instructions might help. If you're using the Windows version and still have issues seeing notifications after following these instructions, please try uninstalling Blocker by opening the Windows Settings app and clicking Apps. Then install Blocker again afterwards.

Blocking

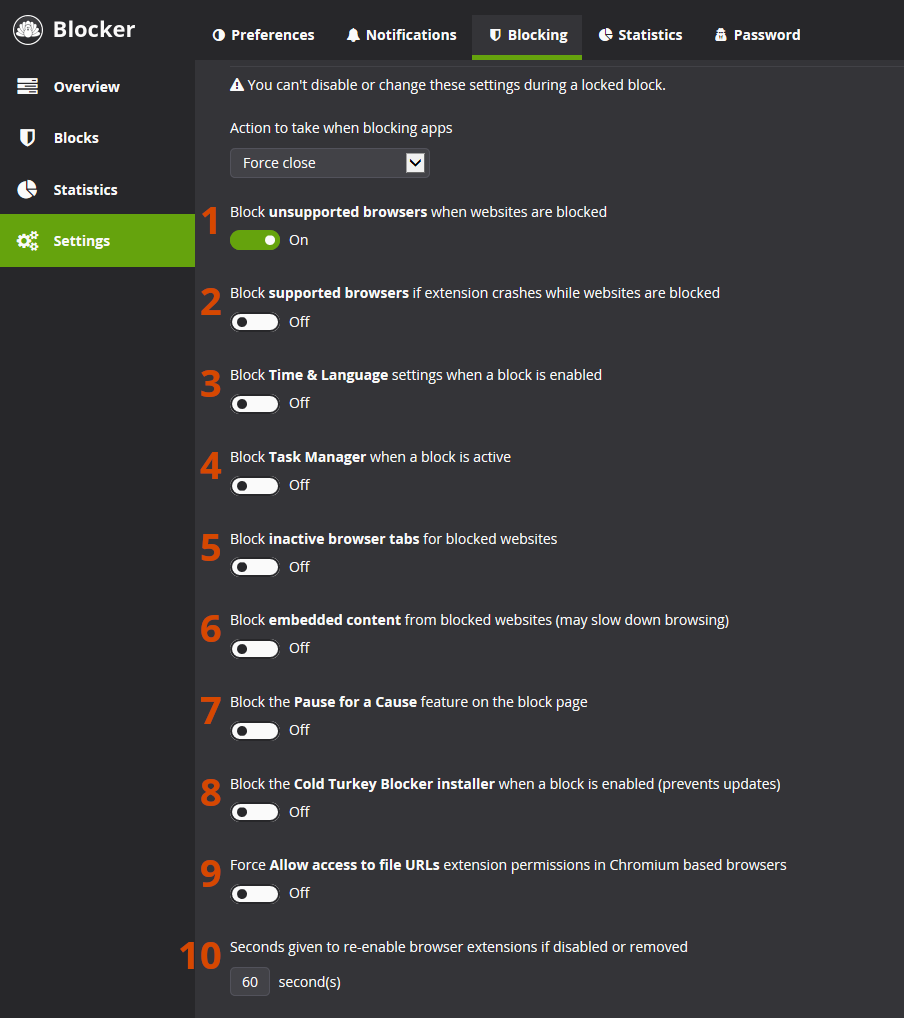
These settings let you block common workarounds to Blocker. As such, they can't be disabled during locked blocks. Oh, and Frozen Turkey settings as well, but you can see those in the Frozen Turkey section.

1

Block unsupported browsers

Blocker tries it's best to detect and block unsupported browsers. If you find an unsupported browser that isn't blocked during a locked block, please feel free to contact me on the support page to let me know. I'll try to add it in for future versions.
2

Block browsers if extension crashes

If enabled, Blocker will close supported browsers if it detects that you: 1) used the browser's task manager to stop the extension or 2) ended a process related to the normal functioning of the extension.
3

Block time changes

If enabled, Blocker will prevent you from changing the system time. This is done by blocking the Settings app (on Windows) or System Preferences (on macOS) if you go to change the time. If you found another way to change the time on Windows, you can block it with instuctions provided in the FAQ on the support page.
4

Block task manager

If enabled, Blocker will block the Windows task manager (or Activity Monitor app on macOS).
5

Block inactive browser tabs

By default, Blocker will only block active browser tabs so that you don't lose what you were doing on blocked sites. This setting allows you to block them regardless of if they are selected or not.
6

Block embedded content

Many sites might have content embedded on their websites. For example, Youtube videos are often embedded on other sites (like tutorial sites) and won't normally be blocked. This setting can be used to prevent this.
7

Block Pause for a Cause

Pause for a Cause is a feature on the block page that lets you donate to charity for a 10 minute break. If you don't want to have this option, enable this setting.
8

Block the installer

This setting blocks the installer from running (because of a known workaround to the block). Note that if enabled, this setting will also prevent you from updating to a new version of Blocker. The uninstaller will always be blocked during a locked block.
9

Force allow access to file URLs

Normally, the extension doesn't block files you load from your hard drive (like pdf files). This setting can be enabled if you want to block yourself from loading certain websites, files or folders on your computer using your browser. These can be blocked by using the file:// prefix when adding entries under the websites tab of your block.
10

Grace period

This setting tells Blocker how long to wait before blocking your browser if you don't enable the extension during locked blocks. 60 seconds is the default and should provide enough time to re-enable the extension. If you end up abusing this delay, you can shorten it to your liking. Note that Blocker only checks extensions in intervals of 10 seconds (to reduce CPU usage).
Screenshot of the block settings tab

Statistics

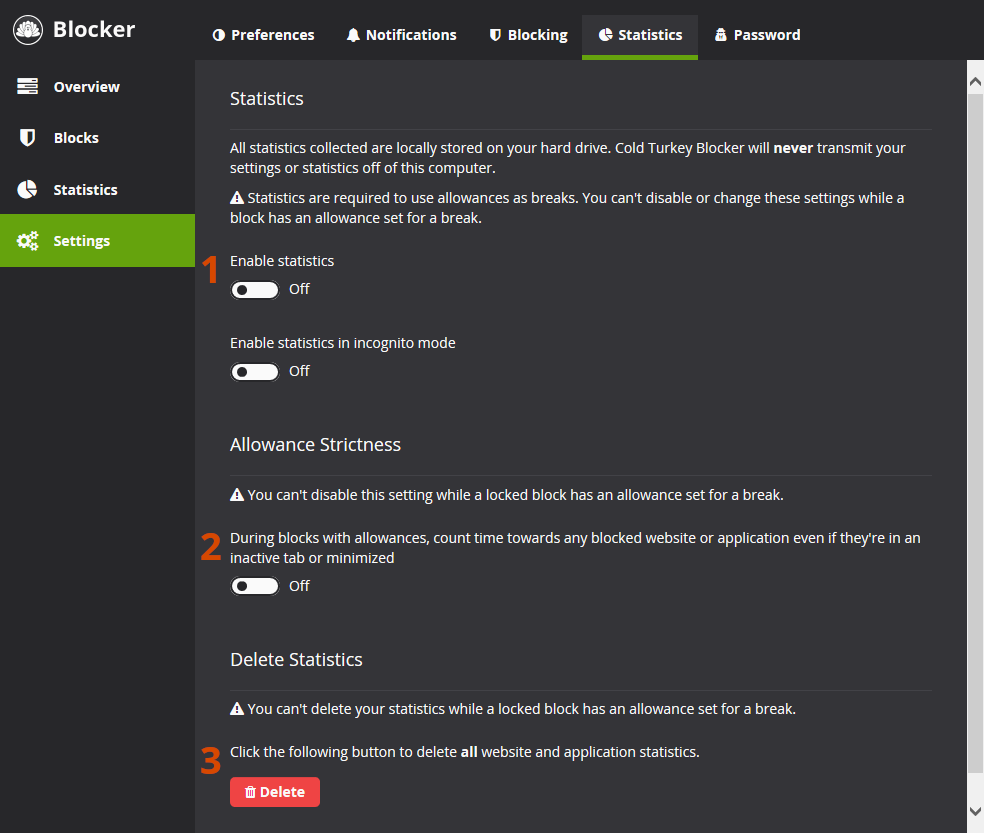
1

Enable statistics

If you don't like having Blocker keeping track of how long you use apps or websites, you can disable statistics here so that they aren't stored on your hard drive. You also have the option of disabling statistics in incognito mode (except during locked blocks with an allowance).
2

Allowance Strictness

If an allowance break is set, Blocker tries to determine if you're actively using the blocked apps or websites before deducting from your allowance. Enabling this feature will countdown your allowance while blocked websites are in inactive tabs or blocked apps are minimized. Blocker will still stop counting down your allowance if you don't move your mouse in 3 minutes (unless your watching a video).
3

Delete Statistics

This button lets you delete any previously stored statistics from your hard drive. Statistics are routinely deleted without needing to press this button to save on disk space.

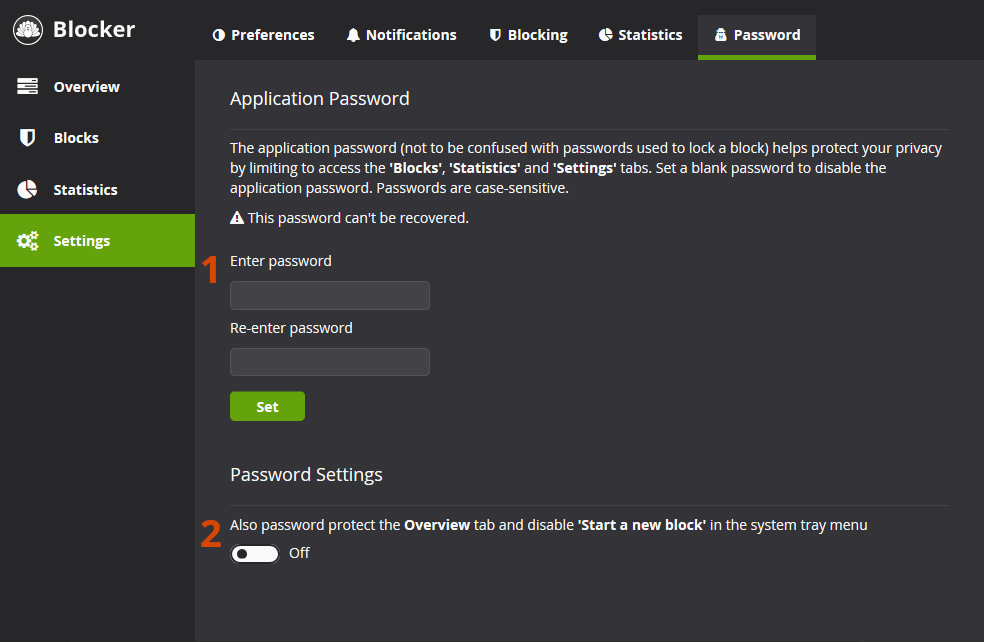
Password

This password is meant to be used for privacy and won't lock a block. You can review the locking section of this user guide for how to do that.

1

Password

This password will be required before opening certain parts of the interface. It can't be removed without a full reinstall, so be carefull not to lose it!
2

Password Settings

If enabled, Blocker will require the password for the Overview tab and will prevent users from starting a block outside of the interface (like through the system menu).
Screenshot of the password settings tab

Command Line Parameters

To run Blocker from the command line on Windows, please close the interface by pressing X and then right click the system tray icon and select exit.

On Windows, Blocker can be run from the command prompt with the following command, including the quotes:

"C:\Program Files\Cold Turkey\Cold Turkey Blocker.exe" [options]

On macOS, Blocker can be run from Terminal with the command, including the quotes:

"/Applications/Cold Turkey Blocker.app/Contents/MacOS/Cold Turkey Blocker" [options]

Where [options] must be one of following formats, excluding the square brackets:

[-add "Block Name" -web "URL"]
Adds a URL to the website tab of a block with the specified name. The block must already exist.

[-add "Block Name" -exception "URL"]
Adds a URL to the exception tab of an unlocked block with the specified name. The block must already exist.

[-start "Block Name"]
Starts an unlocked block with the specified name if the block is disabled or unlocked already.

[-start "Block Name" -lock X]
Starts a locked block for X number of minutes for an unlocked or timed lock (X must be >= remaining minutes).

[-start "Block Name" -password X]
Starts a locked block with X as the password (X must not contain any quotes or spaces). Pro only.

[-start "Block Name" -random-text X]
Starts a locked block with X number of random characters (X must be an integer between 1 and 999).

[-stop "Block Name"]
Stops an unlocked block with the specified name.

[-stop "Block Name" -password X]
Stops a locked block with X as the password. Pro only.

[-toggle "Block Name"]
Starts or stops an unlocked block with the specified name. Frozen Turkey is not supported.

Still need help?

Contact the Developer